
DIY RV Leveling Blocks
Homemade RV leveling blocks allow the recreational vehicle to be level when it is parked (4). The RV should always be leveled when parked (5) within a maximum of two degrees (6) (7) of inclination or gradient (9) (8) represented by a measurement reading of a maximum of half a bubble outside the lateral thin lines equidistant to the center of the vial filled with the spirit (10) (13), normally ethanol (11) because of its low viscosity and surface tension (12).
There are several reasons for the RV leveling (14) (15),
- Allow a good sleep, because an unleveled floor can provoke sleeping issues (1) that affect you in your appeal and also socially (2), although others find no association (3).
2. Minimize stress on the frame (16) and in the structure (17) that supports evenly the weight of the recreational vehicle (18) (19).
3. Allow the flow of ammonia (20) inside the RV fridge allowing proper refrigeration and condensation (21) also for safety reasons (22).
4. Furthermore, leveling is required to have adequate tank fluid readings (23) (24).
5. Finally, in RVs with slideout, the rig requires to be leveled to avoid malfunctions (25) (26)
Homemade RV leveling blocks cost between $ 6 and $32 and can be assembled using wooden planks or rubber pavers under each wheel. Further measuring with a bubble level device is required until retrieving a reading of a maximum of two degrees of inclination or gradient.
Rubber Pavers Or Wooden Planks: Two Recommended Homemade RV Leveling Blocks
Rubber Pavers
Using rubber mats under your levelers means that there it will be more flexible so you will have less stability than using solid blocks of any material, such as wooden planks.
However, I have not evidenced this effect myself.
Those blocks are normally 1″ thick for leveling. I use a large stack under each leg, 6-10 each, the shorter the leg the less wobble walking inside afterwards.
Rubber pavers are very frequently used in outdoor flooring.
Line the straight edge up with the cutting line. This will help to guide your cut so that every cut you make stays straight.
Using your utility knife, begin to make a series of shallow scores along the cut line. You’ll need to put some pressure onto the knife, but don’t press too firmly – this is a gradual process. As you cut, the paver’s weight will pull open the cut line, and you can progress further with each cut. This keeps the friction off of your blade
Rubber pavers are produced through the use of recycled rubber. The rubber is material obtained from unused tires, along with a binding agent such as polyurethane.
Rubber Pavers are practically indestructible; they will not tear and will last longer than other flooring materials, such as carpet. They will never crack or break, like other materials, for they are very durable and will last a lifetime.
Wooden Planks
Using wooden planks is probably the cheapest way to level your RV. However, it does have its downsides. Planks of wood can quickly rot or decay when exposed to the elements. Untreated wood is fine anyway, and you can purchase whitewood, which is the generic non-graded wood, and that one is fine and cheaper.
You can always do a little work with a sander if desired. But it’s also okay if you leave the wood as is. Just make sure the wood is strong enough and isn’t old or decaying.
They also dislodge if the RV weight isn’t distributed evenly. In saying that, knowing how to make your own correct wooden leveler, you can avoid those problems.
So, which size of wooden blocks would be feasible?
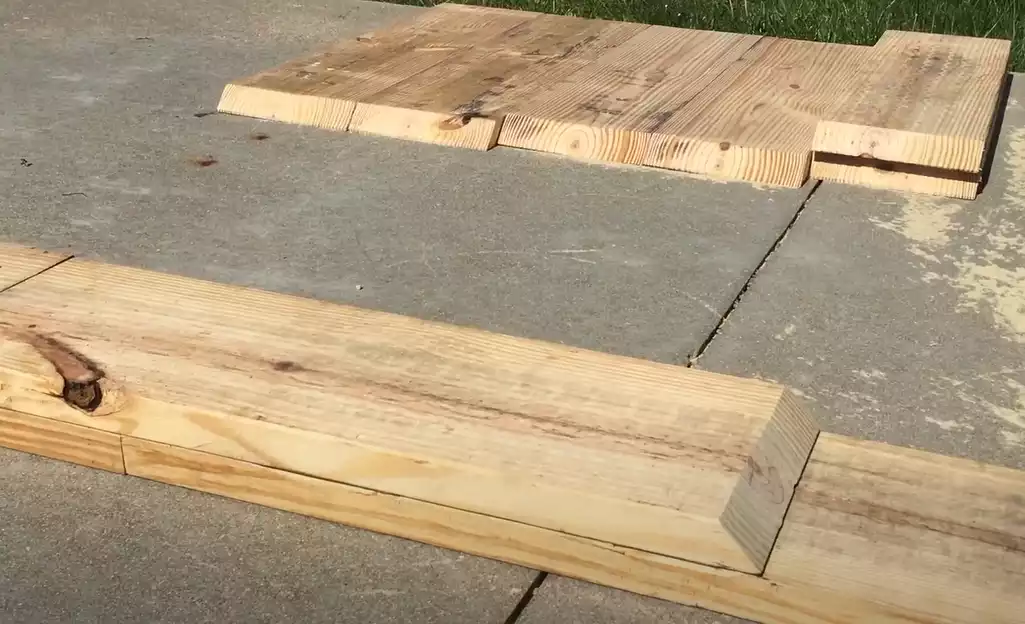
2 X 4″ would not do it unless you put them side by side. I use 2 X 6’s on my fifth wheel. They are just long enough to put one between the 2 tires and a second one either in front of the front wheel or behind the back wheel. You can also have a couple of short ones which can be put on top of the bottom boards if you require more height. The ends of the boards are cut at a 45-degree angle just to make it a little easier to drive on them.
Adjustable Wooden Blocks
To make leveling blocks useful in many different situations, get a length of 2-by-8-inch treated lumber, and a couple feet of ¾-inch PVC tubing. Cut the lumber into three pieces: 14 inches, 20 inches and 26 inches, for each number of blocks you want to make. Angle the edges up on all pieces of wood. The three different sizes will form a pyramid shape. This is to make it easier to drive up on without having a high angle that would make the block slide out of place when trying to drive on it.
Make a stack of three different sizes together, centering them on top of each other. Drill two 1-inch holes through all three leveling blocks but do not drill all the way through the bottom one. This is because you don’t want the pieces of tubing that will hold the stack together to fall through the bottom block when stacked.
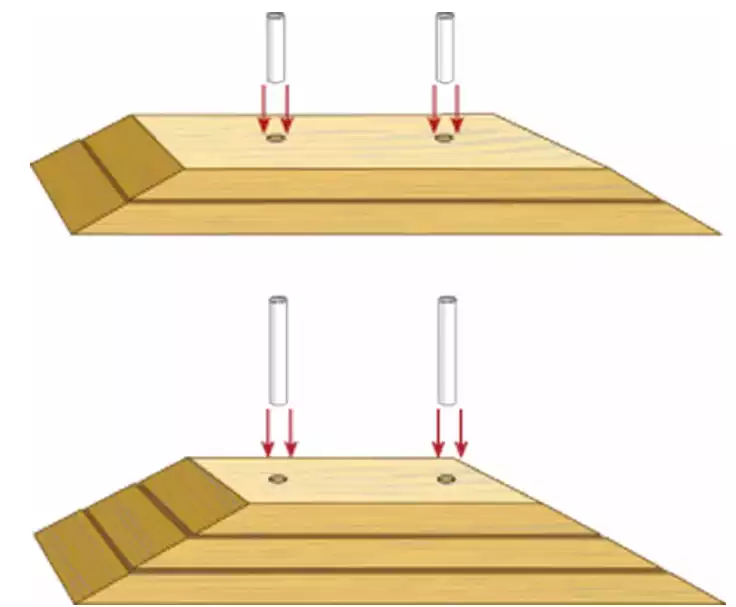
Now cut two sets of the ¾–inch PVC tubing. One set will be longer to hold three blocks together, and the other set will be shorter to hold two blocks together. Make sure to cut the tubing just a little shorter than needed, so that when inserted in the holes they do not stick out of the top.
Repeat the procedure for each set of leveling blocks you wish to make. You should end up with a set for each tire you will need to support.
Now you have sets of leveling blocks that can be used individually or stacked together in combinations.
Pros And Cons of Homemade RV Leveling Blocks
Homemade RV leveling blocks and homemade jack pads are almost always made out of wood planks. While wooden blocks can be a cheap and quick solution, they are not ideal for RV living over time. Therefore, we can recommend utilizing rubber pavers instead.
Pros
- Wooden planks and rubber pavers are less expensive considering you’ll only be paying for the wood, and nails or rubber paver. Untreated wood and whitewood work well and you do not require sanding it.
- Wooden blocks and rubber pavers are customizable. If you’re making them at home you can size them to whatever fits your RV needs with a utility knife.
Cons
- It takes more time with homemade RV leveling blocks than with blocks that you purchase in a pack.
- Wooden planks and rubber pavers will sink in soft soil; meaning you’ll be getting dirty digging them out at the end of your camping trip.
Tools Required To Install Homemade RV Leveling Blocks
The tools required to operate properly with your homemade RV leveling blocks differ whether you utilize a towable RV such as a travel trailer, a teardrop trailer or a bumper pull, or a motorized RVm such as a camper, or a class C RV
Tools Required With Travel Trailers And Other Towables
- A bubble level.
- Blocks: Rubber pavers or 2 x 6 pieces of wood (whitewood or untreated wood works well too), as you prefer.
- Utility knife: If you buy rubber pavers to use as your homemade RV leveling blocks, you will need to cut them accordingly. If instead, you buy wooden planks for the block you will not need them.
- Wheel chocks: Some travel trailers and other towable vehicles still do not have transmissions or parking brakes of their own.
Tools required With Motorized RVs
- A bubble level
- Utility cutter knife: The utility knife is to cut the rubber pavers, in case you use pavers as leveling blocks.
- Blocks (Rubber pavers or a few 2-inch by 6-inch pieces of wood if you prefer)
We do not require wheel chocks with motorized RVs as we will use the parking brakes of the RV
Manual Installation Of The RV Leveling Blocks
Homemade RV leveling blocks should be adjusted after we have set them up in their position. This adjustment will be done manually.
Let´s see now the manual adjustment of the homemade RV leveling blocks step by step:
1. Grab your bubble level and check your level both left to right and front to back. A countertop can be a good spot to place the level. You might be able to level your RV just by raising one low corner onto blocks, so chock your level both left to right and front to back before you start.
2. If your level is off ONLY front to back, raise your front wheels or your back wheels by driving up on blocks. Which ones you raise onto blocks depends on what your bubble level is telling you.
3. If your level is off ONLY left to right, raise both of your right wheels or both of your left wheels by driving up on blocks. Which ones you raise onto blocks depends on what your bubble level is telling you.
4. If your level is off a bit BOTH left to right and front to back, adjust by raising the one low corner up on blocks.
Remember that you always want to start out as level as possible.
If the level is way off, and you would need to drive onto a stack of more than three leveling blocks, you need to choose another campsite. However, I consider that RV parks are already very plain and this will not be an issue.
Many Class B and Class C RVs will not have an auto-leveling system, as this is a feature that we will find in the class A RVs. Therefore you will need to manually level your motorized RV once we have completed the layout of the RV leveling blocks.
You will need to level your RV both left to right and front to back. Here are the steps you need to know to get your rig level.
Leveling Your RV Left to Right
Use Your Bubble Level
1. As you are pulling into your campsite, try to get as close as possible to being level left to right. Rolling forward or backward as you’re pulling can help you get close to level left to right.
2. Using a handheld bubble level (or a built-in level inside your RV) check your level left to right. Some good spots to place that handheld bubble level are on the RV floor, the RV’s rear bumper, or a countertop.
Go Up On Blocks
3. If you’re not level, grab your set of blocks. To get level left to right you’re going to raise your left tires or your right tires by pulling the RV onto blocks.
4. Decide if you need to raise the right tires or the left tires to become level left to right.
5. Look at the angle of your campsite and trailer. Decide if it will be easier to roll back onto blocks or to pull the RV forward up onto blocks. If you’re going to roll back, place your blocks behind the wheel. For pulling forward, lay the blocks in front of the wheel. If you’re close to level, try going up on just one block. If you’re off by a bit, try going up onto two blocks.
6. Check to see if you are now level. If you’re not yet level, you may need to add another block. Make it easier to drive up (or rollback) on the blocks by building a platform––for example, use five blocks to make a kind of ramp or slope to go up the height of two blocks
Chock Your Wheels
7. Now that you are level from left to right, do NOT unhitch. Instead, grab your wheel chocks and chock the wheel that you did not raise up blocks. Place a wheel chock on both sides of the tire so that your camper can’t roll.
Unhitch
8. With both wheel chocks firmly in place, you can now go ahead and unhitch.
Level Your RV Front to Back
Use Your Bubble Level
1. Grab your bubble level one more time, but this time check the level of your RV front to back.
Adjust the Jack
2. To get your RV level front to back, adjust your level by either lowering your Fifth-Wheel’s Landing Jack or your travel trailer’s A-Frame Jack, onto blocks. Some jacks are power jacks and some are hand-crank jacks.
Stabilize
3. Now that your RV is level, lower (or place) your stabilizers. Be sure there is equal pressure on all of them.
4. Now that your RV is both level and stabilized, you can extend your slides if you have them.
Alternatives To Homemade RV Leveling Blocks: Hydraulic, Autoleveling, And Purchased Leveling Blocks
There are two main alternatives to the homemade RV leveling blocks we discuss here: Hydraulic systems, and also the auto-leveling system that we would find often in class A RVs.
Of course, another very common alternative to the homemade RV leveling blocks is to purchase your own blocks.
We will normally see a combination of two systems: Autoleveling using an hydraulic system.
Hydraulics
Hydraulic leveling systems are an easy way to get precise leveling for your RV. The system will raise or lower a section of the RV, as needed.
Commonly, hydraulic systems go along with auto-leveling, which is also an alternative to homemade RV leveling blocks.
This is the case with the Entegra coaches, where the owner will extend the slideouts and activate the leveling jacks on the coach or class A RV. The system operates using hydraulic fluid under high pressure.
It can move single corners independently, however, it is better to lift a whole end or side simultaneously. Moving single corners excessively can twist the frame of your RV.
It’s also important to consider the surface your RV is on. This should preferably be a hard surface, such as concrete. If the RV is on a soft surface, such as dirt or even soft asphalt, it could cause the jacks to sink into the ground.
Purchasing Instead Of Homemade RV Leveling Blocks
We recommend to utilize homemade RV leveling blocks because they are much cheaper and because you can DIY easily.
Most leveling blocks can be locked together to form an incline. This will make it much easier to keep them in place as your RV drives onto them.
These use an interlocking system that enables them to support a tremendous weight, up to 40,000 pounds to be exact. All these systems can cost about sixty dollars.
For me it is interesting that we can save around fifty dollars and build these homemade RV leveling blocks ourselves with a visit to your home center to buy wooden blocks or an utility knife to cut rubber pavers.
However, it is fine if you just want to buy these RV leveling blocks and save some time. There are plenty of popular styles on the market, including the following:
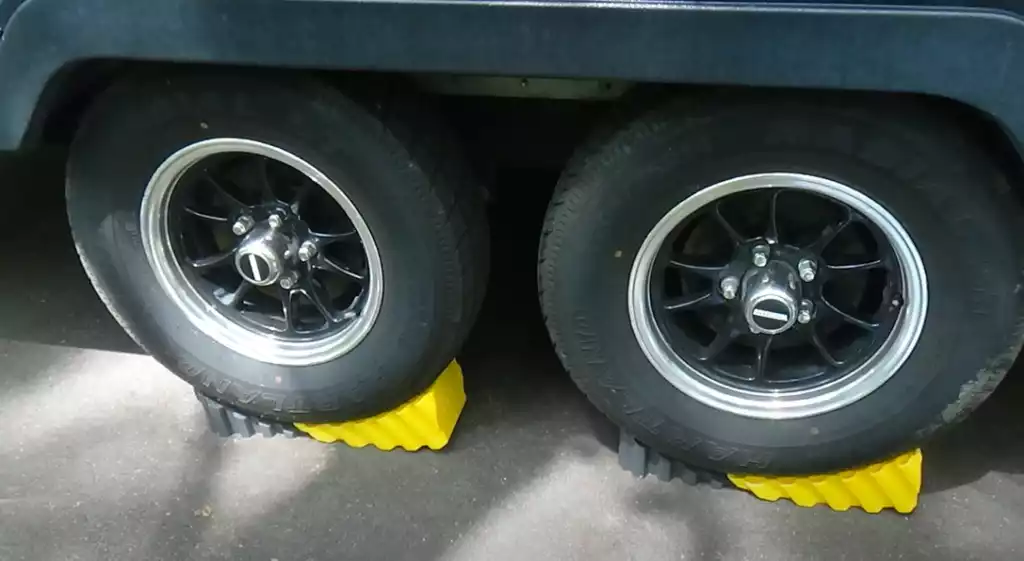
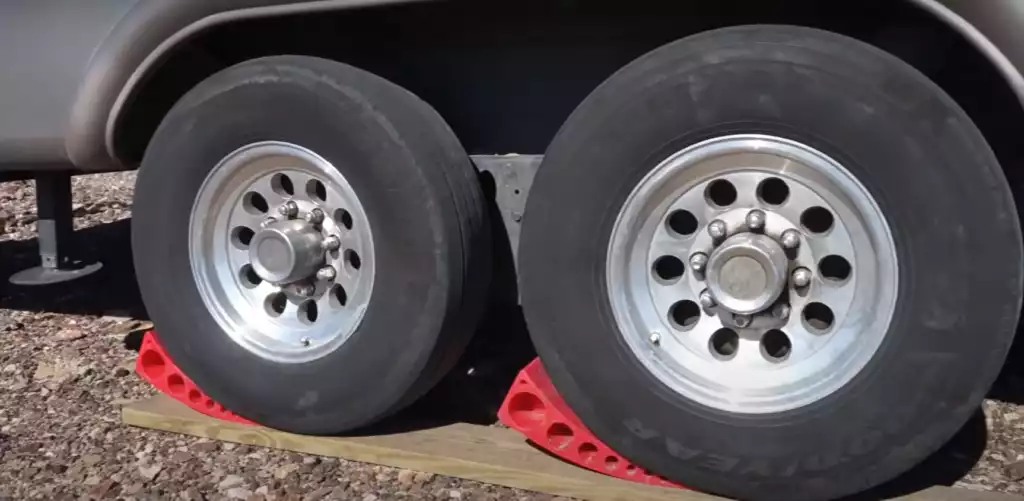
RV leveling blocks: There’s no doubt you’ve seen these blocks sitting under RV tires throughout most campgrounds. Leveling blocks are easy to use, light, stackable, and very affordable (as low as a few dollars for a 4-pack). Although it can take a few tries to get your desired height just right, they’re a great option for many types of RVs – just be sure to check your product’s maximum load capacity. Keep in mind that over time, they can become fragile and crack, but replacement is simple.
RV leveling tire lock: Although less common than blocks or ramps, this RV leveling tire lock is still a great option – but only for light trailers. It’s easy to set up and eliminates the trial and error involved in using RV leveling blocks. Just keep in mind that this option is more expensive than both blocks and ramps, and it has a tendency to sink into the soil underneath your RV tire.
RV leveling ramps: In terms of convenience, you just can’t beat an RV leveling ramp. With leveling blocks, you have to go through a range of motions if you didn’t get the level right the first time (like getting back in your RV, reversing off the blocks, removing a block, and trying all over again). With leveling ramps, however, simply put the wedge in front of or behind your wheel(s), get in, and move until your partner tells you that you are level. There’s a wide range of RV leveling ramps available on Amazon for great prices too.
Automatic RV Leveling
Included normally by class A RVs, we will find out that they utilize an hydraulic system to perform the leveling.
Some of the fancier class A RVs will have a button, marked “Level.” This button will automatically make the motorhome level itself. Some will even be able to raise the RV off its tires.
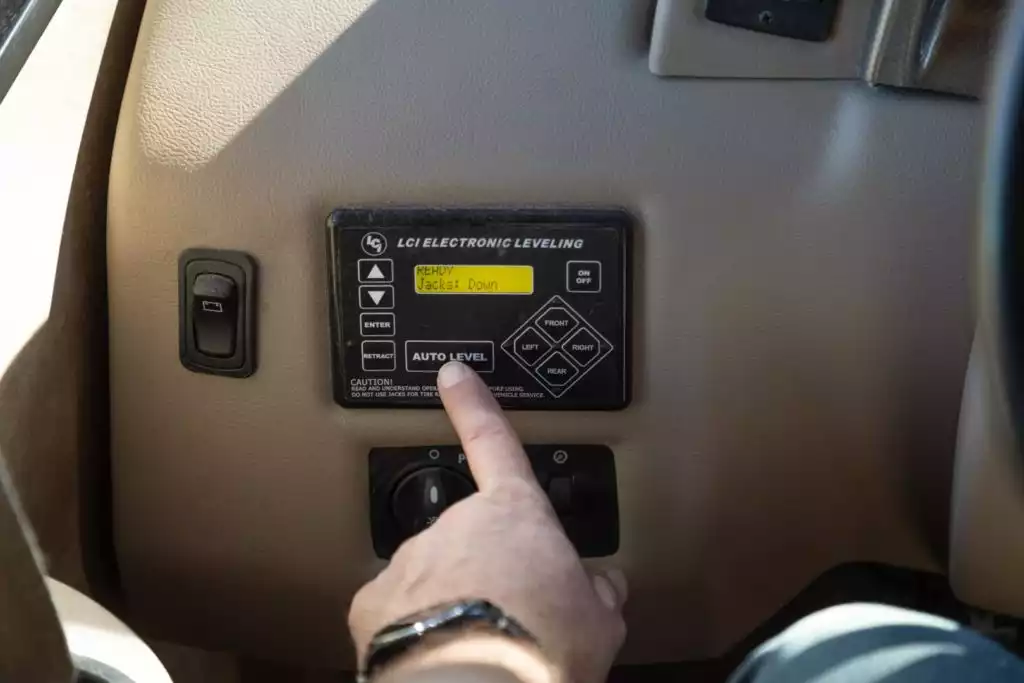
Most Class A’s and some towable RVs are equipped with an Auto-Leveling System or hydraulic leveling system that makes leveling as easy as the push of a button.
These generally make any adjustments you need by using hydraulic jacks to easily raise the low corners of your RV. These systems are great, but you still need to start fairly level, so get your bubble level out and make sure you’re as level as possible before you begin.
When you arrive, park the front end of the RV to the downhill side of an uneven campsite or parking space. You want your low corners in the front so that you’ll be leveling by raising the front end of the RV rather than the rear.
This is a must because when you’re in Park only your rear wheels are locked. Your RV could roll off the jacks if one or both of the rear wheels is raised off the ground! If you have any doubts, check your front wheels and use the parking brake if applicable.
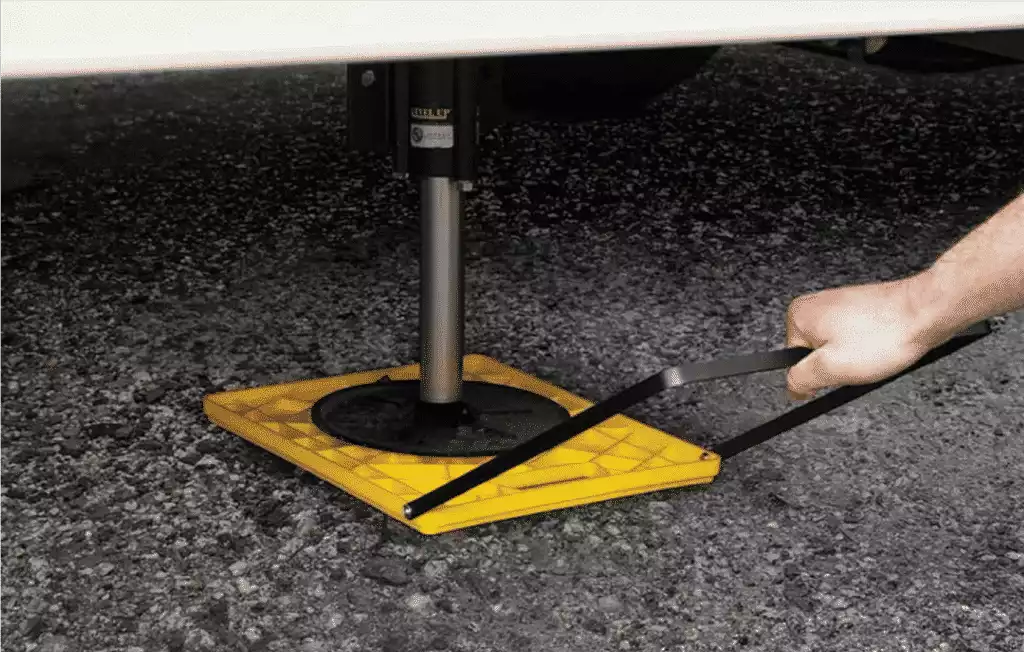
After parking adequately, place blocks or jack pads under your jacks. Make sure you’re not about to place your jacks down on an icy or slick surface or the foot pads could slip.
Jack pads prevent your jacks from sinking in and protect the campsite’s parking pad. Remember that jacks can sink on asphalt if it is hot.
3. Use your control panel to level your RV using your Auto-Leveling System. Your control panel will have lights telling you which corners are low. Use the corresponding buttons to automatically level those.
Each leveling system is going to vary so be sure to read the manuals you receive at the dealership for details on the specific leveling system installed in your RV.
Conclusions
Homemade RV leveling blocks can often be stacked to the perfect height and they sit underneath your tires to adjust your trailer’s position. Having an RV leveling system in place is particularly helpful when staying at national parks or older campgrounds that haven’t been pre-leveled (although this is very rare)
No matter which auto-leveling system you have, never lift your RV wheels beyond the ground when extending your rear stabilizers. Also, remember to check your RV’s manual to find out if your RV needs the slides extended before or after the RV is leveled.